FacebookTwitterPinterestGoogle+InstagramRSS Simply in Control

Tuesday, November 19, 2013

Winter Theme Party Ideas

I've always had a thing for themed parties. I find them cute and creative! A couple of years ago I had a winter themed party at my place for a few friends. Here are a few ideas:


I had lined the ceiling with these Styrofoam snowflakes I bought at Party City for very cheap. They were attached with strings at varying lengths.  

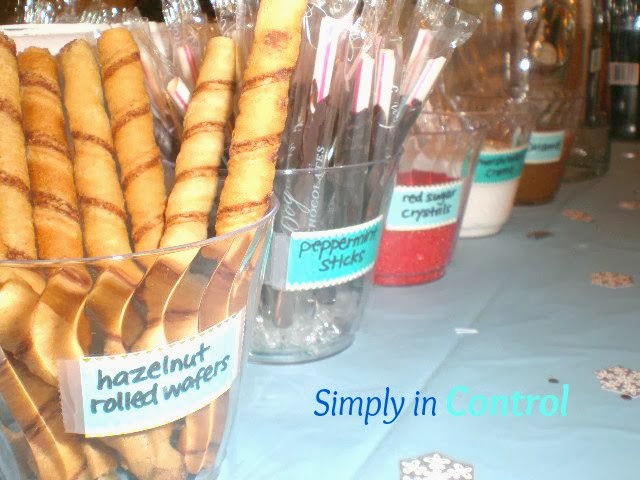
 This table was set up to function as a hot chocolate stand for the guests who were coming in. They had their drinks with cookies as they waited for the rest of the guests to arrive.

Here are some of the flavors that could be added to the drink


The cupcakes were s'mores flavored with Hershey's on top


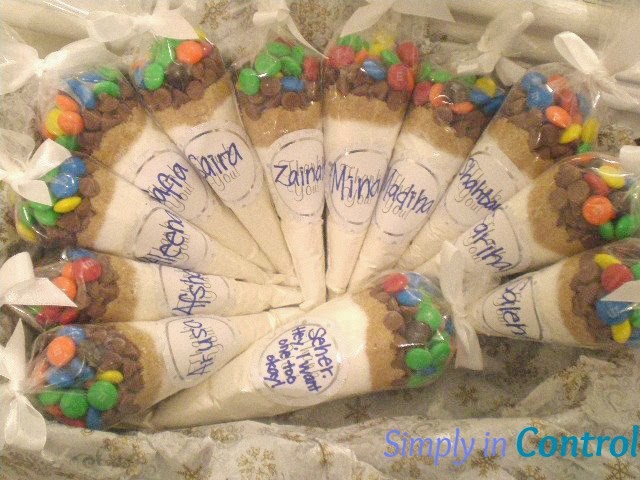
 The party favors were also set on this table. They were ingredients to Chocolate Chip and M&Ms cookies displayed in a cone.

The appetizers included garlic bread, cream of mushroom soup, crackers with dips and these cute olive penguins:

These are made of small and large sized olives, cream cheese and carrots. The instructions can be found here


It's ideal to choose some main dish which is appropriate for winter. I made Shepherd's Pie as it was warm and filling. I made 12 individual portions for the guests as it looked cute. Also made some creamy pasta to go with this.

And for dessert, 12 personal sized Molten Lave Cakes! Recipe can be found here.

 These beautiful ornaments were hung year round from the ceiling in my old apartment. They are super cheap when on clearance and make a bold statement when in a central location, like above the coffee table in the living room. This also went well with the Winter Theme Party!


Monday, November 11, 2013

EASY Molten Lava Cake Recipe


This is a super simple recipe for Molten Lava Cake that I learned from somewhere and I had to share! Here are the steps:


1) Make chocolate cake batter using any cake mix.

2) Fill the batter into muffin trays and bake as directed.
2) Turn the cakes upside and hollow out from top.
4) Add in hot chocolate fudge
5) Cover with a large scoop of vanilla ice cream
6) And finally, top that with hard shell sauce made for ice cream!


Chocolate cake at its finest! Absolutely delicious! Let me know if you try it :)


Also, please don't waste the hollowed out cake. It tastes just as delicious with hot fudge and ice cream! :)

Hope you enjoyed this post! Don't forget to Like this page on Facebook and Follow me on Pinterest! Thanks for visiting! 


Linked to:

Tuesday, November 5, 2013

Realistic Coat Closet Organization

Our coat closet had become a disaster zone. So I turned to Pinterest for inspiration to get me started. I noticed that most of the pictures up, especially the ones from magazine styled websites, weren't very realistic at all. The coat closet is a central location in the household used by all family members. Since when did all family members together have a total of 3-4 coats, which were all color coordinated? Don't get me wrong, the closets were gorgeous. Just not realistic. So I decided to see what I could do myself. The coat closet is directly next to my Apartment Entryway that I recently changed up.
 

 Here's the before...painful, I know:
The issues:
-Green plastic hangers (??)
-Too many clothes
-Door space not maximized
-Don't know what I will discover underneath the coats!!

I cleared out the entire space. Found an old bookshelf at the back of the closet, along with 2 air mattresses (why??) and other junk in the closet. I had bought some wooden hangers from IKEA because the plastic ones were all arching and deforming because of the heavy coats. I also already had this hanger on hand which I used for the scarves: 


This hanger allowed me to put up 10 scarves instead of 1!


Here are the steps I took:

1) Donated coats that I don't wear often. This allowed more breathing space in the closet.
2) Wooden hangers made a huge difference. They hold the coats' heaviness a lot better than plastic hangers, and look more uniform.
3) Ordered the coats according to length, and categorized them into mine, my husband's and my son's.
4) Used the spare bookshelf for extra shoes that didn't fit on the shoe shelf, and added a basket.
5) Organized scarves on pant hanger
6) Added some simple decor by writing out "His" and "Hers" on both sides.

Don't want to use wall decals? Draw your own designs on designed paper and use gel pen to make it look like decal.


This basket is from the Dollar Store and holds miscellaneous items

An old bookshelf with some extra shoes

This area definitely looks more organized than it used to! I didn't color coordinate this closet like my own one because I knew it would be difficult for other family members to keep up with it. Adding the "His" and "Hers" sign was a nice, simple touch that reminds us not to just dump our coats in anywhere but keep it either on the left or right hand side.

Hope you enjoyed this post! If you'd like more updates, don't forget to Like this page on Facebook and Follow me on Pinterest! Thanks for visiting!

Linked to:
Remodelaholic
A Bowl Full of Lemons

Pin It

Related Posts Plugin for WordPress, Blogger...